Lumin Onboarding Guide
Introduction
This guide is for financial institutions ready to integrate Pinwheel into their Lumin online banking app. This plugin (henceforth called the Pinwheel plugin) unlocks instant direct-deposit and/or bill switching for all users of your online banking app. See our Deposit Switch and Switch Kit product pages for more.
Getting Pinwheel installed to your Lumin apps involves the following key actions:
- Get set up with Pinwheel
- Get Pinwheel installed and enabled in your Lumin UAT environment
- Test the Pinwheel plugin in UAT
- Get ready for production
- Test in production
- Enable Pinwheel for all users
The steps below walk you through each of these in detail.
1. Get set up with Pinwheel
This guide assumes you already have access to our Developer Dashboard. If you don’t have this set up yet, please contact us at [email protected] and let us know you're a Lumin customer.
2. Get Pinwheel installed and enabled in your Lumin UAT environment
For this step, Lumin does two things:
- Lumin creates a UAT environment for you, if it doesn't already exist.
- Lumin installs/enables the Pinwheel integration in the UAT environment
Once a Lumin UAT environment is set up, Pinwheel:
- Enables the plugin in Sandbox mode for your financial institution
- Gives permission to Lumin to do Direct Deposit and/or Bill Switches on your financial institution's behalf, using the
customer_idprovided by Lumin.
There is nothing for your financial institution to do in this step.
3. Test the Pinwheel integration in UAT
We recommend doing extensive testing here in UAT - not because we expect there to be issues that need to be resolved - but because it's a great way to get familiar with Pinwheel's Deposit Switch. It's a great tool for anyone on your team to learn about all the things your users can do, and what it looks like when problems arise.
In UAT, the Pinwheel plugin makes all requests in Sandbox mode. This means simply that we simulate connecting to payroll platforms and performing direct deposit switches.
We use special sandbox credentials to simulate various scenarios. The most basic scenarios involve "happy path" or successful direct deposit switches using both PreMatch (credential-less) and Core (user provides credentials) flows.
Simulating PreMatch (credential-less) flows
In order to simulate PreMatch flows, you'll need to be able to create test users in UAT with specific first and last names. These users will also need values for date of birth, social security number, but as long as they look valid (e.g. a SSN needs to be 9 digits), they can be anything.
As an example, to test a PreMatch flow in which the user matches with the Paycor payroll platform, create a test user with the first name user and last name paycor. Other sandbox user names for PreMatch scenarios can be found here.
Note: sandbox PreMatch flows currently only simulate successful flows. To test other scenarios, use the Core flow below.
Simulating Core (credentialed) flows
By default, your integration will attempt to do a prematch flow. Even if your test user matches a particular platform, you can opt out of the prematch flow by choosing "Search for Different Account".
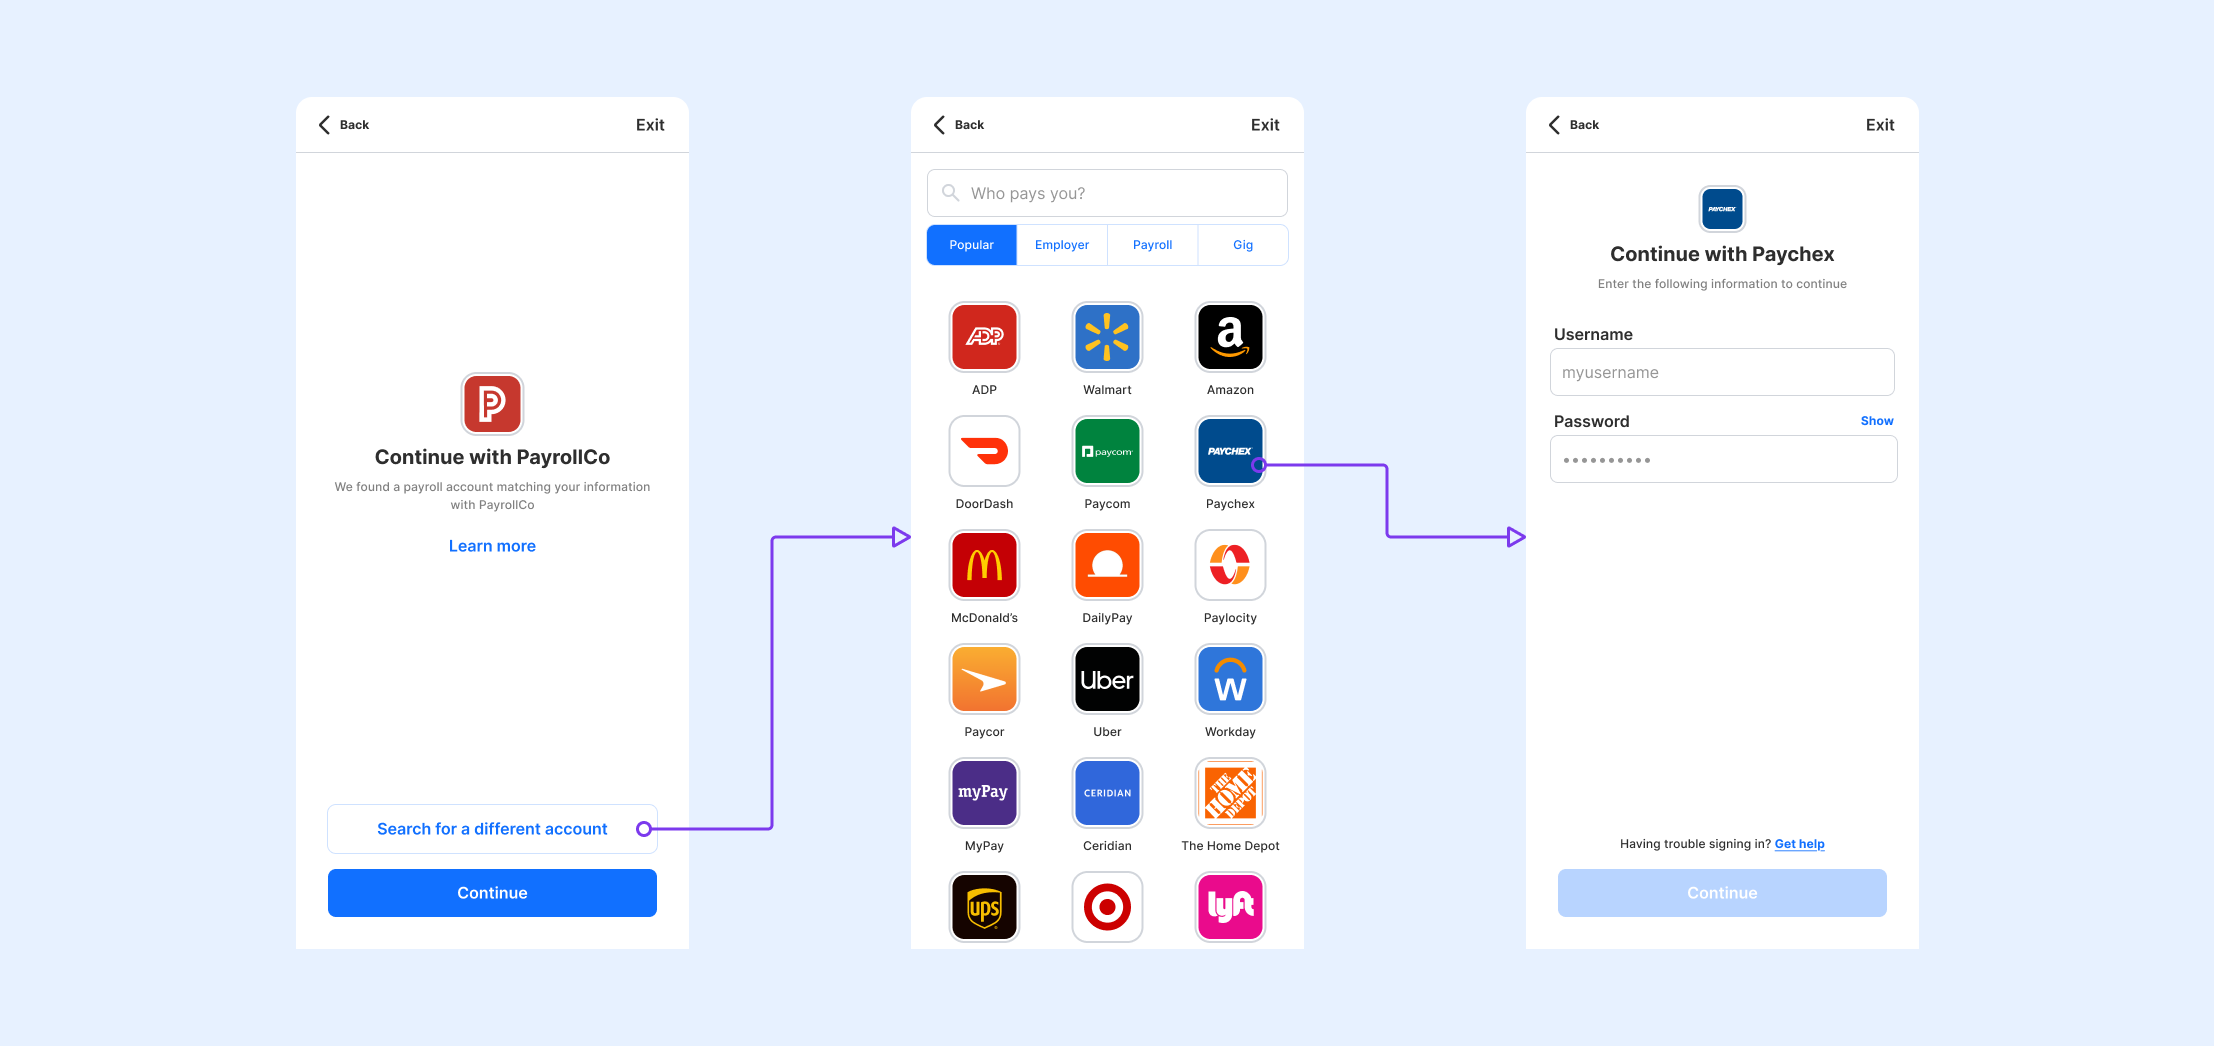
On the following screen, choose a payroll platform (e.g. ADP). Next, you'll be guided to log in with credentials. For happy path scenarios, enter in user_good and pass_good for the username and password.
There are many other scenarios that are worth testing. We have different sandbox user credentials to trigger more complex authentication (e.g. a platform asking for an MFA token as part of auth). Other credentials test features (e.g. Direct Deposit Forms), and others test error scenarios. We have a specific username for every error scenario that can occur.
Note: some sandbox credentials reference Pinwheel products that do not apply to Direct Deposit Switch and can be ignored in your testing.
Once UAT testing is complete, you're ready to install the Pinwheel plugin in production!
4. Get Pinwheel ready for production
If you don't already have a production Lumin environment, Lumin will set that up. Either way, Lumin will also install Pinwheel into the production environment.
On the Pinwheel side, the next step is to reach out to your Pinwheel account executive and request access to Production mode. Once production is enabled, head to the Developers tab on the Developer Dashboard to create an API key in Production mode.
Click "Create new key" in the Production section. You will be prompted to save your API secret, as this is the only time you will have access to it. It's not strictly necessary for you to manage your API secret. To be clear, it is necessary for you to create a key in production mode, as this signals to Pinwheel that you have production access to our Deposit Switch product.

6. Test in Production
At this point, we recommend performing internal testing in production with employees or "friends and family" end-users who are account holders in your institution.
As these are real direct-deposit switches, testing in production gives an additional opportunity to confirm success by logging in directly to the test user's payroll account, and verifying it matches the expected allocations used in the Pinwheel test.
7. Enable Pinwheel for all users
At this point, you're ready to go live! Lumin will perform the final step of making the Pinwheel plugin available to all users on your platform.
Updated 8 days ago